My sister brought me one of her favorite dresses that needed a significant fit adjustment across the back.
At first, I thought I’d just sew a half-inch piece of elastic along the top edge of the back, but as I looked closer at it, I decided it needed a little extra for a few reasons:
- Exposed elastic be lazy, and I personally hate the feel of elastic against my skin. (Yes, I know this isn’t my dress, but if I hate it, why would I subject my sister to it?)
- I wasn’t keen on the idea of a line of visible stitches across the back.
- Taking in the amount she wanted was going to involve stretching the elastic to the max, which makes it harder to feed evenly through the sewing machine.
- Seemed like a lot of potential to end up looking weird if it was just a narrow strip sewn to the top edge.
So I pivoted. I didn’t have any orange serger thread, but I did have two spools of red wooly nylon, so I used those for the most visible threads (loopers) and used white for the needle threads.
- I went with a 2″ wide pre-stretched elastic.
- I unpicked the side seams along the back waistband to access the already-existing pocket created by the folded fabric of the band.
- I inserted the elastic, lined it up with the raw edge of the side seam, and re-serged the seam. Then I repeated with the other side seam.
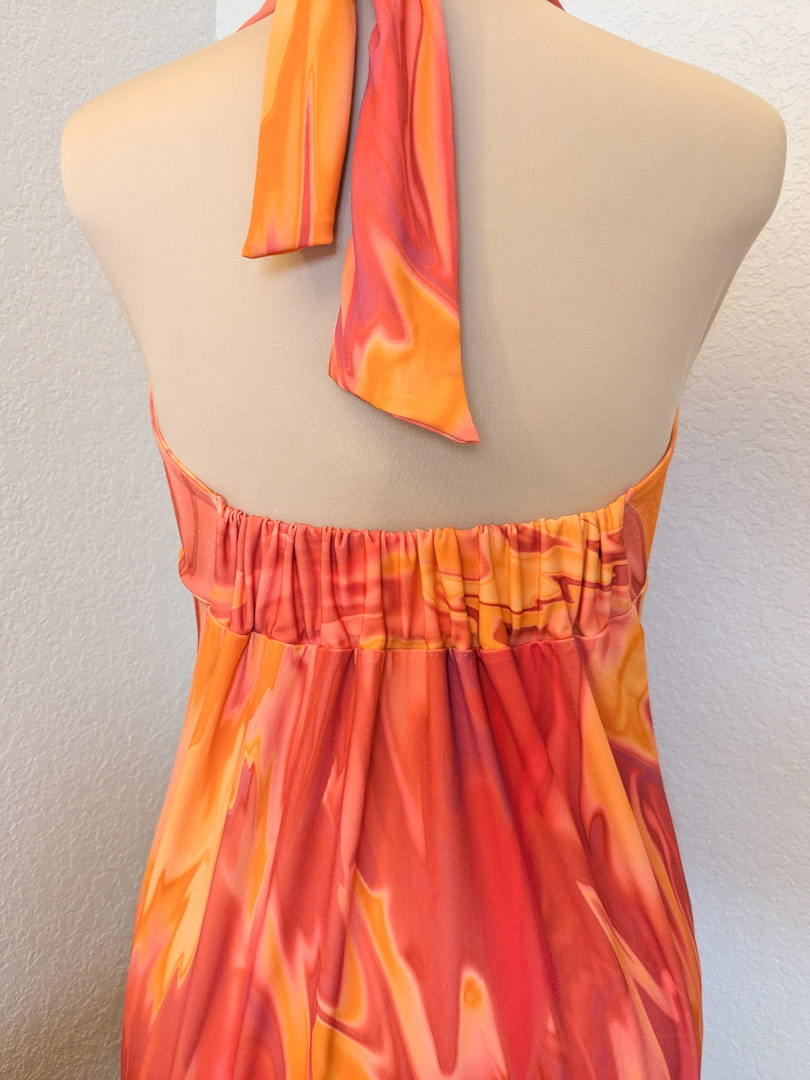
This is so much more elegant!
- The elastic is completely enclosed.
- No visible stitching on the outside.
- Much easier execution; no stretching of the elastic required during construction, meaning tidier, better controlled results.
- Lovely, adjustable gathers along the back.
- Takes in the full height of the waistband so we avoid awkward gathering of the lower portion of the waistband.
- Almost looks like it was originally made this way (if not for the side seams being pulled to the back.)
The Moral of the Project
Nobody likes unpicking seams, but it’s worth it in the end!
Project Settings
Sewing Machine vs. Serger
| Sewing Machine | Serger |
|---|---|
|
|
Sewing Machine Settings
| Presser Foot | Stitch# | Stitch Width | Stitch Length | Needle | Top Thread Tension | Application |
|---|---|---|---|---|---|---|
| applique (F) | 0 | 3.5 | 2.4 | blue tip | 4 | seam allowance tack |
Serger Settings
| Stitch Name | 4-thread overlock |
|---|---|
| Needles | R, L |
| Finger | B |
| Threads | 4 |
| Tension Left Needle | 4 |
| Tension Right Needle | 4 |
| Tension Upper Looper | 4 |
| Tension Lower Looper | 4 |
| Cut Width | 6 |
| Stitch Length | 2.5 |
| Differential | 1.0 |
| Application | seams |
Leave a Reply